Appetizers
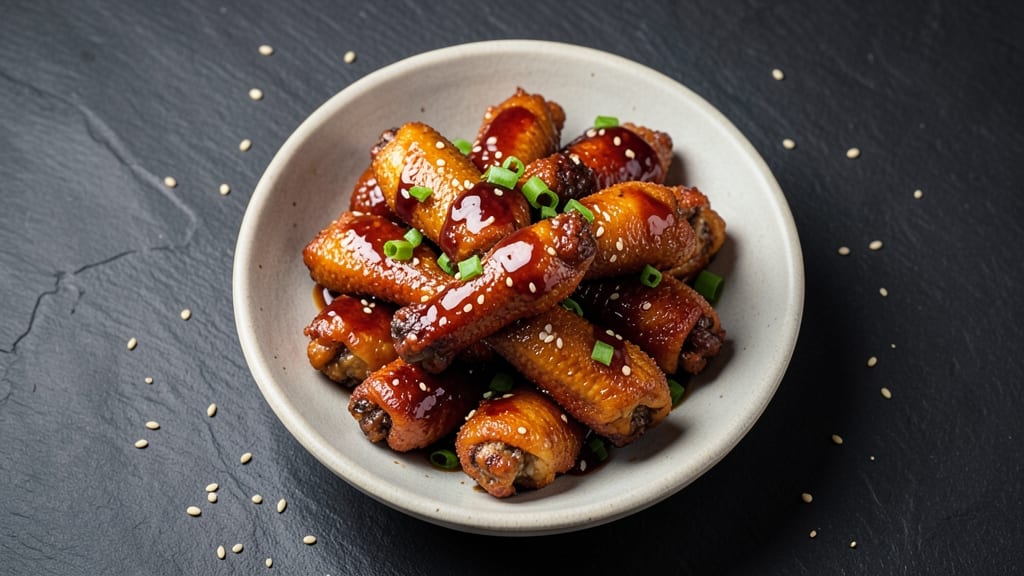
This Chinese takeout chicken wings recipe delivers the same sticky-sweet glaze and crispy texture you crave from your favorite restaurant. The secret lies in a precise balance of honey, soy sauce, and a light batter that stays crispy even after frying.
I perfected this technique during a particularly busy week when takeout cravings hit, and it became an instant crowd-pleaser at my restaurant.
The wings start with a simple batter of flour, baking powder, and cornstarch that creates that signature crispy exterior, while the glaze—a blend of honey, soy sauce, rice vinegar, and garlic—adds that perfect sweet-savory balance.
What sets this recipe apart is how the glaze actually clings to each wing, creating that familiar takeout experience without requiring any special equipment. The process is straightforward but requires attention to timing, especially when frying or baking to maintain that ideal texture.
By the time you're done, you'll have a platter of golden, crispy wings glistening with that signature honey-soy glaze that sticks to every bite. The aroma alone will have everyone gathering around the table, and the flavor—sweet, tangy, and slightly umami—will remind you of your favorite Chinese restaurant.
Serve with a side of steamed rice or egg rolls for the full takeout experience.
This recipe works equally well for frying, baking, or air-frying, making it versatile for any kitchen setup. The glaze can also be adjusted to suit your taste—more honey for extra sweetness or a splash of sriracha for heat.
Let's get started on wings that taste like they came straight from your favorite takeout spot.
Ingredients for chinese takeout chicken wings
Fourteen ingredients. Two steps. Wings that taste like your favorite takeout spot.
| Ingredient | Amount | Notes |
|---|---|---|
| Chicken Wings 🍗 | 2 lb | Split into drumettes and flats |
| All-Purpose Flour 🌾 | 1 cup | For crispy batter coating |
| Cornstarch 🌾 | ½ cup | Extra crispiness booster |
| Baking Powder 🍞 | 1 tbsp | Lightens the batter |
| Salt 🧂 | 1 tsp | Kosher or sea salt |
| Black Pepper 🌶️ | ½ tsp | Freshly ground preferred |
| Garlic Powder 🧄 | 1 tbsp | For subtle garlic flavor |
| Honey 🍯 | ½ cup | Light or dark preferred |
| Soy Sauce 🍶 | ½ cup | Light or dark variety |
| Rice Vinegar 🍶 | 1 tbsp | Adds tangy brightness |
| Sesame Oil 🫒 | 1 tbsp | For nutty aroma |
| Garlic Cloves 🧄 | 3 cloves | Minced for glaze |
| Vegetable Oil 🫒 | 2 cups | For deep frying (350°F) |
| Green Onions 🧅 | 2 whole | Sliced for garnish |
| Sesame Seeds 🌾 | 1 tbsp | Toasted for garnish |
The chicken wings are the star, so don't skimp on quality. Look for fresh, never-frozen wings at your local butcher or grocery store's meat counter—they'll stay crispier longer. I always grab Costco's Kirkland brand when I'm doing a big batch, but the regular supermarket stuff works fine for a weeknight dinner. Split them into drumettes and flats yourself if you can—pre-cut wings often have more connective tissue. For the glaze, Kikkoman soy sauce is my go-to, but any light or dark variety will work. The honey should be light and smooth—Manuka or clover honey both add nice depth.
No sesame oil? Toasted sesame seeds plus a splash of peanut oil works in a pinch. Short on rice vinegar? Apple cider vinegar at half the amount gives similar tang. The cornstarch is non-negotiable for crispiness—it's what makes these wings stay crunchy even after frying. Want extra heat? Add 1 tsp sriracha to the glaze. The batter should be thick but pourable—if it's too stiff, add a splash of water. For the oil, vegetable or canola oil works best, but peanut oil adds even more flavor. And trust me, toasting the sesame seeds in a dry pan for 30 seconds before sprinkling makes a huge difference.
These wings reheat beautifully—just pop them in the oven at 375°F for 10-12 minutes. Store leftovers in an airtight container with a paper towel on top to keep them crispy for up to 3 days. For longer storage, freeze the cooked wings (without the glaze) for up to 2 months. The glaze can be made ahead and stored in the fridge for 1 week. I always double the glaze recipe—it's perfect for drizzling over rice or noodles too.
Why You'll Love This Recipe
- Five-Ingredient Magic: I swear by this combo—flour, cornstarch, and baking powder make the batter light yet crispy without needing fancy equipment. The wings stay juicy inside while getting that perfect golden crunch, and honestly? You won’t miss the takeout markup.
- Takeout Taste, No Drive-Thru: That salty, slightly sweet, umami-packed flavor? It’s all in the seasoning blend (even if you wing it with store-bought). The wings taste like they’ve been air-fried for hours, but I’m doing it in my oven in 40 minutes—no grease splatter, no waiting for delivery.
- Game for Any Night: Serve them as a snack with beer, toss them into a wok with veggies for a quick stir-fry, or pile them on a bed of rice for a lazy dinner. My kids eat them straight from the pan, and my partner saves the leftovers for “emergency” lunches—no judgment here.
- Budget Crunch Savior: A pound of wings and a bag of flour cost less than one takeout order, and the leftovers reheat like a dream. I make a double batch, freeze half, and still have wings for game day—no last-minute grocery runs or overpriced menus.
Step-by-step instructions for Chinese takeout chicken wings
Here's how to make crispy, sticky-sweet wings that taste just like your favorite takeout.
Prepare the Wings and Make the Batter
Pat the 2 lb chicken wings dry with paper towels—this helps the batter stick better. Separate them into drumettes and flats, discarding any damaged pieces. In a large bowl, whisk together the 1 cup all-purpose flour, 0.5 cup cornstarch, 1 tbsp baking powder, 1 tsp salt, 0.5 tsp black pepper, and 1 tbsp garlic powder until completely combined. This dry mix is what gives those wings their signature crispy texture.
I like to add the wings to the bowl in batches, shaking off any excess flour after each toss. This ensures an even coating without making the batter too thick. Let the coated wings sit for 10 minutes while you heat the oil—this resting time helps the batter adhere even better.
Deep Fry the Wings to Golden Perfection
Fill a deep pot or Dutch oven with the 2 cups vegetable oil and heat it to 350°F using a thermometer for accuracy. The oil should shimmer but not smoke when you drop a small piece of battered wing in—this is your perfect frying temperature. Fry the wings in batches (don't overcrowd the pot) for 12-15 minutes, turning occasionally, until they're deep golden brown and floating.
The key here is patience—rushing leads to uneven cooking. You'll know they're done when the batter is crispy and the internal temperature reaches 165°F. Drain the fried wings on a wire rack set over a baking sheet to allow excess oil to drip away. Keep them warm in a 200°F oven while you make the glaze.
Make the Honey-Soy Glaze
In a small saucepan, combine the 0.5 cup honey, 0.5 cup soy sauce, 1 tbsp rice vinegar, 1 tbsp sesame oil, and 3 minced garlic cloves. Bring to a simmer over medium heat, then reduce to low heat and let it cook for 5-7 minutes, stirring occasionally, until slightly thickened. You're looking for a consistency that coats the back of a spoon—this glaze should be sticky but not syrupy.
Here's a pro tip: If the glaze starts to bubble too vigorously, reduce the heat immediately. You want it to thicken gradually so the flavors meld properly. The vinegar adds that perfect tangy brightness that cuts through the sweetness, while the garlic and sesame oil give it that authentic takeout aroma.
Toss and Glaze the Wings
Return the fried wings to the pot they were cooked in (or use a clean skillet if you prefer). Pour the honey-soy glaze over them and toss gently to coat evenly. Let the wings sit in the sauce for 2-3 minutes so they absorb that sticky goodness. This is where the magic happens—the glaze should cling to every crispy bite, creating that perfect balance of sweet, salty, and umami.
For extra flavor, sprinkle the sliced 2 whole green onions over the wings while they're still hot. The onions add a fresh, crisp contrast to the rich glaze. Serve immediately with toothpicks and extra glaze on the side for dipping—this is the moment these wings truly shine.
Garnish and Serve
Transfer the glazed wings to a serving platter and sprinkle with the 1 tbsp toasted sesame seeds. I like to toast the seeds in a dry skillet over medium heat for 1-2 minutes until fragrant before sprinkling—they add a nutty crunch that elevates every bite. Garnish with additional sliced green onions if desired.
Serve these wings hot with celery sticks and carrot slices for dipping, just like takeout. The contrast of the crispy, sticky wings with the cool, crunchy vegetables makes each bite even more satisfying. These wings keep well in the refrigerator for 3 days or can be frozen for up to 1 month—just reheat in the oven at 375°F for 10-15 minutes to restore that perfect crispiness.
Pro Tips For Making Chinese Takeout Chicken Wings
- TRIM THE FAT, KEEP THE FLAVOR: Pat those wings dry before dredging in flour—wet skin makes the batter cling like glue, and you end up with soggy, uneven coating. I used to skip this and wondered why my wings never got that crispy takeout crunch.
- USE CORNSTARCH LAST: Mix the cornstarch separately from the flour and baking powder, then toss it with the coated wings right before frying. This keeps the coating light and airy instead of gummy—my first batches turned out like sad dumplings because I mixed everything at once.
- FRY IN BATCHES, DON’T CROWD: Drop wings in one layer with space between them—overcrowding drops the oil temp fast, leading to greasy, uneven cooking. I learned this after frying a whole tray at once and ending up with wings that looked like they’d been deep-fried in lard.
- REST THE WINGS AFTER FRIERING: Let them sit 5 minutes on a wire rack before saucing—this stops the steam from turning your perfect crisp into a sad, limp mess. I know, I know, you want to eat them now, but trust the process. (Your future self will thank you.)
Serving suggestions for this dish
Takeout-Style Plating
Serve these wings on a large platter lined with a white paper towel or parchment paper—this mimics that classic takeout look. Arrange them in a slightly overlapping pattern so they look abundant and inviting.
I like to use wooden skewers or toothpicks for serving, just like your favorite restaurant. 🍽️
Add a small bowl of extra glaze in the center of the platter for dipping. This not only makes the presentation look authentic but also lets guests customize their level of stickiness.
For extra flair, place a few fortune cookies or chopsticks around the platter—it’s those little details that make it feel like takeout night.
Classic Sides
Steamed jasmine rice is my go-to side—it’s neutral enough to let the wings shine but soaks up any extra glaze beautifully. Cook about 1 cup uncooked rice with 1.5 cups water and a pinch of salt, then fluff with a fork.
For a more authentic takeout experience, serve it in small white bowls with a drizzle of the honey-soy glaze. 🍚
Add crispy egg rolls or potstickers for a full menu feel. I grab these from the freezer section at Trader Joe’s—their chicken potstickers are always a crowd-pleaser. Warm them in a skillet with a little oil until golden and crispy.
For a lighter option, serve cucumber salad with rice vinegar, sesame oil, and a pinch of sugar.
Dipping Sauces
While the honey-soy glaze is the star, a spicy sriracha mayo or plum sauce adds variety. Mix 2 tbsp mayo with 1 tsp sriracha and a squeeze of lime for a tangy kick.
For plum sauce, simmer ½ cup plum jam with 1 tbsp soy sauce and 1 tsp rice vinegar for 5 minutes until thickened. Serve these in small shot glasses or mini bowls for a restaurant-style touch.
Don’t forget celery sticks and carrot slices—they’re the classic takeout veggies that cut through the richness. Arrange them in a clear glass bowl with a sprinkle of sesame seeds for a pop of color.
For extra fun, add a small container of sweet chili sauce or duck sauce for guests who like to mix it up.
Presentation Hacks
Use red and white striped paper under the platter to mimic takeout containers. I grab this from the party supply aisle at Michaels—it’s cheap and adds instant authenticity.
For a modern twist, serve the wings on a slate board with the sides arranged around it like a charcuterie board. 🎨
Garnish the platter with edible flowers or microgreens for a gourmet touch. A few pink or white edible flowers from the grocery store’s produce section add a pretty contrast to the golden wings.
For a playful touch, write "Enjoy!" in soy sauce on a small piece of parchment paper and place it on the platter.
Nutrition facts
Frequently asked questions
Can I make these wings without deep frying?
For a healthier version, bake the battered wings at 400°F for 20-25 minutes until golden and crispy. Air fry at 375°F for 12-15 minutes, shaking the basket halfway. The texture won't be identical to fried, but they'll still be delicious and stickier than most baked wings.
How do I keep the wings crispy when reheating?
Reheat in a 400°F oven for 8-10 minutes on a wire rack to maintain crispiness. For air fryer reheating, use 375°F for 5 minutes. Never microwave—it turns the batter soggy. Pro tip: Keep leftovers in an airtight container with a paper towel on top to absorb moisture.
What's the secret to getting that perfect sticky glaze?
The glaze needs to be thick but pourable—simmer it until it coats the back of a spoon. The key ingredients are the honey-to-soy ratio (1:1) and reducing it slightly for cling. For extra stickiness, toss the wings in the glaze while still hot from frying, then let them sit for 2-3 minutes before serving.
Can I make the glaze ahead of time?
Yes! The glaze keeps well in the fridge for 1 week and freezes for 3 months. Reheat gently before using—simmer on the stove for 2-3 minutes or microwave for 20 seconds. For best results, make it fresh for the wings, but it's great for drizzling over rice or noodles too.
What if my batter is too thick or too thin?
If too thick, add 1 tsp water at a time until it's spreadable but not runny. Too thin? Add 1 tbsp flour or cornstarch and mix well. The ideal consistency is like pancake batter—thick enough to coat but thin enough to spread. The cornstarch is crucial for that signature crispiness, so don't skip it.