Side Dishes
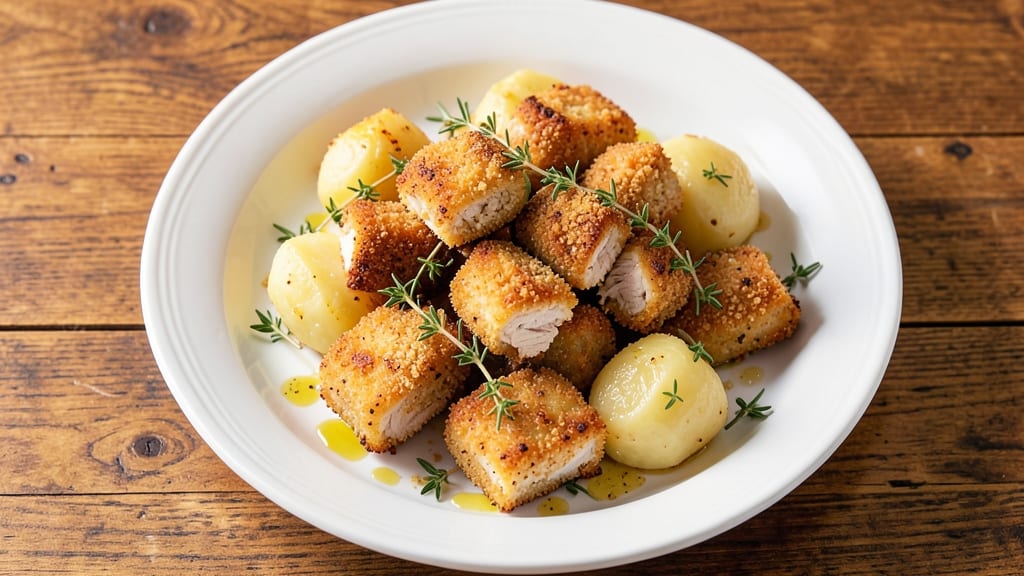
This one-pan chicken and canned potatoes recipe transforms simple ingredients into a hearty, crispy-topped comfort meal that requires just 30 minutes of active time.
Growing up in small-town Georgia, I learned that the best meals often come from minimal effort and maximum flavor—this dish delivers exactly that with tender chicken and perfectly seasoned potatoes all cooked together.
The secret lies in browning the chicken first for depth of flavor, then layering it with drained, seasoned canned potatoes and a sprinkle of breadcrumbs for that signature crispy golden crust.
This method ensures the potatoes stay tender while the top develops a satisfying crunch, all without dirtying multiple dishes. It’s the kind of recipe that feels indulgent but comes together effortlessly.
By the time it emerges from the oven, you’ll have a dish that’s rich, savory, and packed with comfort—juicy chicken pieces, creamy potatoes, and a crispy top that begs to be broken into.
The aroma alone will have everyone gathered around the table, and the leftovers reheat beautifully for days. This is the kind of meal that makes weeknights feel like a celebration.
Serve it with a simple green salad or steamed vegetables to round out the plate, or enjoy it as-is for a satisfying, one-dish dinner.
The beauty of this recipe is its flexibility—swap in different herbs or spices to suit your taste, or add a drizzle of garlic butter for extra richness. Let’s get cooking!
Ingredients for chicken and canned potatoes
Simple pantry staples and a few fresh touches make this crispy chicken and potatoes dish shine.
| Ingredient | Amount | Notes |
|---|---|---|
| Boneless, Skinless Chicken Thighs 🍗 | 1 ½ lb | Cut into bite-sized pieces |
| Canned Potatoes 🥔 | 2 cups | Drained, rinsed, and sliced |
| All-Purpose Flour 🌾 | ½ cup | For dredging chicken |
| Panko Breadcrumbs 🍞 | ½ cup | For crispy topping |
| Dried Thyme 🌿 | 1 tsp | Or 1 tbsp fresh thyme |
| Garlic Powder 🧄 | 1 tsp | Fresh minced works too |
| Onion Powder 🧅 | 1 tsp | For savory depth |
| Salt 🧂 | 1 tsp | Kosher or sea salt |
| Black Pepper 🌶️ | ½ tsp | Freshly ground preferred |
| Olive Oil 🫒 | 2 tbsp | For browning chicken |
| Butter 🧈 | 2 tbsp | Unsalted, for richness |
| Chicken Broth 💧 | ½ cup | Low-sodium preferred |
| Fresh Parsley 🌿 | ¼ cup | Chopped, for garnish |
The chicken thighs are the foundation—boneless, skinless thighs stay juicier than breasts during the longer bake. Look for plump, firm thighs at the meat counter, and ask for them to be trimmed if they're not pre-cut. Costco or Trader Joe's often have them pre-packaged, which saves time. For the potatoes, canned varieties like Red LaSalle or Great Value work perfectly—they're pre-cooked and drain quickly. Avoid the chunky-style cans; the sliced or diced versions break down better in the oven. Fresh parsley is ideal for garnish, but dried parsley at half the amount works in a pinch.
No panko? Crushed cornflakes or regular breadcrumbs will give you a crispy top, though panko holds its shape better. Short on thyme? Dried oregano or rosemary at the same amount adds a different but equally comforting note. The olive oil and butter combo is key—olive oil for browning, butter for richness. If you're avoiding dairy, swap the butter for melted coconut oil. The chicken broth can be subbed with water plus 1 tsp chicken bouillon, but the broth adds depth. For extra crispiness, toss the breadcrumbs with 1 tbsp melted butter before sprinkling on top.
This dish reheats beautifully—cover with foil and warm at 350°F for 10 minutes. Leftovers keep for 3-4 days in the fridge, though they're best enjoyed fresh. For meal prep, assemble the dish ahead but bake it just before serving to keep the topping crispy. The crispy bits are the best part, so don’t skip the breadcrumb layer—it’s what makes this dish feel special. Store any extra broth in an ice cube tray for future soups or sauces.
Why You'll Love This Recipe
- I’ll be real: this recipe keeps me fed without breaking the bank. Chicken thighs are cheaper than breasts, canned potatoes last forever, and the flour/panko are pantry staples. Leftovers? Even better—reheat and serve with store-bought salad greens, and suddenly it’s dinner again.
- Pantry Magic: I swear by this recipe when I’ve got nothing but a can of potatoes and a bag of chicken thighs. No fresh veggies? No problem. The crispy panko crust on the chicken and the fluffy, buttery potatoes feel like a full meal—even when it’s just me and a microwave dinner.
- Crispy-Creamy Fix: Honestly, the flour-dredged thighs with panko breadcrumbs hit different. That golden crunch gives way to juicy chicken, while the canned potatoes soak up every bit of garlic and thyme—no one’s guessing they’re from a can. It’s the kind of dish that makes you pause mid-bite.
- Lunchbox Hero: Between us, this is my go-to for meal prep. Toss the cooked chicken and potatoes into containers with a sprinkle of dried thyme, and you’ve got a portable, no-reheat-needed lunch. My kids actually eat it cold—proof it’s that good.
Step-by-step instructions for chicken and canned potatoes recipe
Here's how to create a comforting one-pan dish with tender chicken and crispy potato topping.
Prepare the Chicken with Seasoned Breading
Cut the 1.5 lb boneless, skinless chicken thighs into bite-sized pieces, about 1-inch cubes. In a shallow bowl, combine the 0.5 cup all-purpose flour, 1 tsp dried thyme, 1 tsp garlic powder, 1 tsp onion powder, 1 tsp salt, and 0.5 tsp black pepper. Toss the chicken pieces in this seasoned flour mixture until evenly coated, shaking off any excess.
This dry rub will create a flavorful crust while the flour helps create a golden sear. Don't skip shaking off excess flour—it prevents a gummy coating. Transfer the coated chicken to a plate and set aside while you prepare the potatoes.
Sear the Chicken for Maximum Flavor
Heat 2 tbsp olive oil in a large oven-safe skillet over medium-high heat. Once the oil shimmers (about 2-3 minutes), add the floured chicken pieces in a single layer, leaving space between them. Cook undisturbed for 3-4 minutes until the chicken develops a golden-brown crust on one side.
Flip the chicken pieces carefully and cook for another 3-4 minutes until golden on all sides. The chicken should release easily from the pan when ready. Remove the chicken and set it aside on a plate, leaving the rendered oil and browned bits in the skillet—these contain precious flavor that will enhance your dish.
Cook the Potatoes in the Chicken's Flavorful Oil
Add the 2 cups drained and sliced canned potatoes to the same skillet, spreading them evenly over the chicken oil and browned bits. Cook over medium heat for 5-6 minutes, stirring occasionally, until the potatoes begin to soften and take on color from the oil.
This step is where the magic happens—the potatoes absorb all that delicious chicken flavor from the browned bits. You'll know they're ready when they begin to soften slightly and release their aroma. If the potatoes stick, add 1-2 tablespoons of chicken broth to help them release and cook evenly.
Create the Crispy Topping and Finish the Dish
In a small bowl, mix together the 0.5 cup panko breadcrumbs and the remaining 0.5 tsp black pepper. Sprinkle the breadcrumb mixture evenly over the potatoes, pressing down gently with a spatula to ensure even coverage. This creates the signature crispy topping that makes this dish so comforting.
Dot the top with 2 tbsp butter, dividing it evenly. Pour the 0.5 cup chicken broth around the edges of the skillet, being careful not to disturb the breadcrumb topping. Transfer the skillet to a preheated 400°F oven and bake for 15-18 minutes, until the breadcrumbs turn a deep golden brown and the potatoes are tender.
Rest and Garnish for Perfect Presentation
Remove the skillet from the oven and let the dish rest for 5 minutes before serving. This resting period allows the juices to redistribute, ensuring each bite is moist and flavorful. Garnish with 0.25 cup chopped fresh parsley just before serving to add a pop of color and freshness.
The result should be tender chicken, creamy potatoes, and a perfectly crispy breadcrumb topping that delivers on that comforting promise. Serve immediately while the topping is still crispy and the chicken is warm throughout.
Pro Tips For Making Chicken And Canned Potatoes
- PAT THE THIGHS DRY: Wipe those chicken thighs with paper towels before dredging—they’ll crisp up way better. I used to skip this, and my coating always ended up soggy, no matter how much flour I used.
- DRAIN AND RINSE POTATOES: Dump the canned potatoes into a colander and rinse them under cold water to wash off that weird, waxy coating. It makes a real difference in texture, especially if you’re serving them straight from the can.
- FRY IN BATCHES: Don’t crowd the pan—this isn’t a buffet line. Cook the chicken in small batches so the oil stays hot enough to get that golden crust. I learned this the hard way after walking away from a pan of greasy, limp chicken.
- TOSS THYME IN LAST: Sprinkle the dried thyme over the breadcrumbs after dredging, not before. It clings better and won’t get drowned out by the flour. (Yes, it’s a tiny detail, but it actually changes the outcome.)
Common mistakes when making great chicken and canned potatoes
Overcrowding the Pan
One of the biggest mistakes I see is overcrowding the skillet when searing the chicken. When you pack too many pieces in at once, the temperature drops and the chicken steams instead of browning.
I always aim for a single layer with space between each piece—this ensures a proper golden sear that builds deep flavor. If your pan is too small, work in batches and don't rush the process. 🔥
Skipping the Resting Time
After baking, many people can't wait to dig in, but skipping the 5-minute rest means juices will pool at the bottom instead of distributing throughout the dish. This results in dry chicken and soggy potatoes.
Trust me, those few minutes make all the difference in texture and moisture. I've learned this the hard way—rushing leads to disappointment!
Using Wet Potatoes
Drained canned potatoes still contain moisture, and adding them directly to the pan without drying them first can lead to a watery mess. After draining, pat them dry with a paper towel or let them sit in a colander for 5-10 minutes to absorb excess liquid.
This ensures they'll crisp up properly under the breadcrumb topping instead of turning mushy.
Uneven Breadcrumb Distribution
The crispy topping is what makes this dish special, so don't just sprinkle breadcrumbs randomly. Press them gently but firmly over the potatoes to create an even layer. If you leave gaps, you'll end up with soft spots rather than a uniformly crispy finish.
I like to use the back of a spoon to distribute them evenly before baking. 💫
Ignoring the Broth
Many recipes call for broth, but some home cooks skip it to save time. That broth is crucial for two reasons: it prevents the breadcrumbs from burning and adds moisture to the potatoes.
Pour it around the edges of the skillet so it doesn't disturb the topping, but don't skip it entirely—it's what keeps everything tender and flavorful.
Not Preheating the Oven Properly
An oven that isn't properly preheated can lead to uneven cooking and a soggy topping. Always preheat your oven to 400°F for at least 10 minutes before baking.
I also recommend using the middle rack for even heat distribution. A properly preheated oven ensures that crispy, golden-brown finish we all crave.
Nutrition facts
Frequently asked questions
Can I use canned chicken instead of fresh?
Canned chicken works perfectly for this recipe—just drain and rinse it thoroughly to remove excess sodium. Use 1.5 cups of shredded canned chicken (about the equivalent of 1.5 lbs fresh) and follow the same searing and baking steps. The texture will be slightly different but still delicious, especially when mixed with the creamy potatoes.
How do I make this dish with fresh potatoes?
Swap the canned potatoes for 2 cups diced Yukon Gold or russet potatoes and boil them until fork-tender (8-10 minutes). Drain well, then pat dry with a paper towel. Toss them in 1 tbsp olive oil and 0.5 tsp salt before adding to the skillet. Fresh potatoes will need 2-3 extra minutes in the oven to crisp up properly under the breadcrumbs.
Can I make this recipe in a slow cooker?
This dish isn't ideal for slow cooking, as the crispy breadcrumb topping won't form properly. However, you can adapt it by browning the chicken separately, then combining everything in the slow cooker on low for 2-3 hours with 0.5 cup broth. Skip the breadcrumbs and top with extra herbs instead. The result will be tender but lose the signature crispy texture.
What's the best way to reheat leftovers?
Cover the dish with foil and warm at 350°F for 10 minutes to maintain moisture. For extra crispiness, broil for 2-3 minutes at the end. Never microwave—it turns the potatoes soggy. The breadcrumb topping won't be as crispy as fresh, but reheating this way keeps the chicken juicy and potatoes tender.
Can I add vegetables to this recipe?
Yes! Toss in 1 cup diced bell peppers or zucchini with the potatoes for extra nutrition. Add them during the stovetop cooking phase and reduce the potato amount to 1.5 cups to maintain balance. For heartier meals, include 0.5 cup corn kernels or 0.5 cup chopped green beans. Just adjust the baking time by 5 minutes if adding extra veggies.