Side Dishes
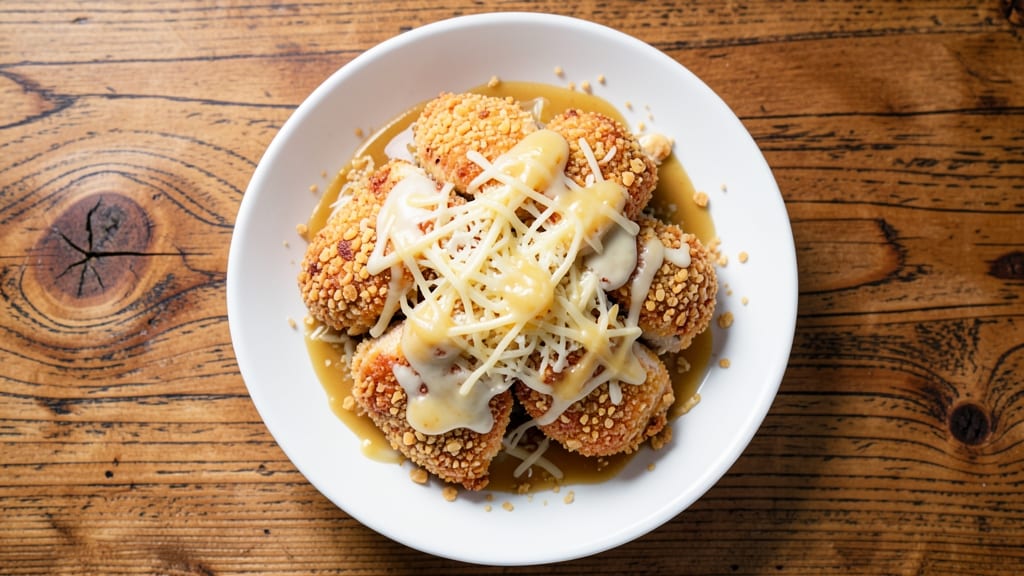
Transforming simple chicken into a crispy, golden masterpiece only takes crushed Kellogg's cornflakes and a few key steps. This recipe delivers a satisfying crunch that pairs perfectly with creamy cheese swirls, creating a dish that's both nostalgic and elevated.
I developed this method after realizing how versatile cornflakes could be beyond breakfast bowls.
The beauty of this recipe lies in its simplicity—no special equipment or advanced techniques required. You'll start with tender chicken pieces coated in a mixture of crushed cornflakes and seasoned breadcrumbs, then bake until golden and crispy.
The secret to that perfect crunch is pressing the cornflakes firmly onto the chicken before baking, ensuring they stay in place.
What you'll end up with is chicken that's irresistibly crispy on the outside, tender on the inside, and topped with melty cheese swirls that add a rich, savory element. This dish works equally well as a main course or appetizer, and it's adaptable to different dietary preferences with simple swaps.
The best part? It comes together in under 30 minutes.
Serve with honey mustard dip or a fresh coleslaw to complete the meal. This recipe proves you don't need complicated ingredients to create something special—just a few pantry staples and the right technique. Let's get started!
Ingredients for kellogg's cornflake chicken
Crispy cornflake crust meets melty cheese swirls—simple pantry staples transform ordinary chicken into an irresistible dish.
| Ingredient | Amount | Notes |
|---|---|---|
| Boneless, Skinless Chicken Thighs 🍗 | 1 ½ lb | Cut into 1-inch pieces |
| Kellogg's Cornflakes 🍞 | 1 ½ cups | Crushed into fine crumbs |
| Panko Breadcrumbs 🍞 | ½ cup | For extra crunch layer |
| Shredded Mozzarella Cheese 🧀 | 1 cup | Low-moisture preferred |
| Cheddar Cheese 🧀 | ½ cup | Shredded for swirls |
| Butter 🧈 | ½ cup | Melted for binding |
| Garlic Powder 🧄 | 1 tbsp | For seasoning |
| Onion Powder 🧅 | 1 tbsp | For seasoning |
| Paprika 🌶️ | 1 tsp | Smoked for color |
| Salt 🧂 | 1 tsp | Diamond Crystal preferred |
| Black Pepper 🌶️ | ½ tsp | Freshly ground |
| All-Purpose Flour 🌾 | ¼ cup | For dredging |
| Large Eggs 🥚 | 1 whole | Beaten for coating |
The Kellogg's cornflakes are the star here—buy the original, not the honey-nut variety, as it provides the cleanest, crispest texture. Store-brand cornflakes work perfectly, but if you want premium crunch, Costco's bulk cornflakes are ideal. For the cheese, Kraft 2% shredded cheddar melts smoothly, while Sargento natural cheddar adds richer flavor. Pre-shredded mozzarella has anti-caking agents that prevent perfect melting, so grate your own from a block if possible. The chicken thighs should be bone-in for better flavor, but boneless works if you prefer convenience. Trader Joe's carries excellent pre-cut thighs at a reasonable price, and Whole Foods offers organic options for a premium touch.
No cornflakes? Crushed potato chips or Ritz crackers work in a pinch, though texture will differ slightly. Panko breadcrumbs can be swapped for regular breadcrumbs, but they won't be as crispy. For a dairy-free option, use nutritional yeast mixed with olive oil to replicate the cheesy swirls. Pre-shredded cheese is convenient but contains anti-caking agents that prevent perfect melting, so grate your own if you're particular about texture. The butter can be substituted with olive oil for a lighter coating, though it may not adhere as well. Garlic powder and onion powder can be replaced with 1 tbsp fresh minced garlic and 2 tbsp finely chopped onion, but the flavors will be more pronounced.
Store uncooked chicken in an airtight container in the fridge for up to 2 days before coating. Pre-crush the cornflakes in a food processor or heavy bag with a rolling pin—no need to pulse finely, just break them into small clusters for optimal texture. Assemble the dish up to 4 hours ahead and refrigerate until ready to bake. Leftovers keep for 3 days in the fridge and reheat beautifully in a 350°F oven for 10 minutes. For freezing, assemble fully, wrap tightly, and bake straight from frozen—add 5-7 minutes to the cooking time.
Why You'll Love This Recipe
- Pantry Magic: I swear by this one—no special trips to the store. Kellogg’s cornflakes and panko are already in my cabinet, so I’m always ready to bread chicken without extra shopping. The cheeses melt into something rich, but the crunch? That’s the real star.
- Crunchy-Creamy Obsession: The cornflakes give it this addictive texture—crispy outside, tender inside—while the cheeses turn it into a cheesy pull-apart dream. Honestly, I’ve never met a breaded chicken I liked more than this one.
- Game for Any Night: Weeknight dinner? Check. Potluck side? Done. Even my picky teen devours it straight from the pan. Between us, it’s the one dish I can make when I don’t know what else to serve.
- Leftovers That Don’t Suck: Cold cornflake chicken? Still delicious. Toss it in salads, reheat it in the air fryer, or just eat it straight from the fridge. And because chicken thighs are cheap, it stretches my budget without sacrificing flavor.
Step-by-step instructions for crispy Kellogg's cornflake chicken
Here's the precise method to achieve that perfect crunchy exterior over gooey cheese swirls.
Prepare the Chicken and Seasoning
Pat the 1.5 lb boneless, skinless chicken thighs completely dry with paper towels. Cut them into 1-inch pieces for even cooking. In a small bowl, combine 1 tbsp garlic powder, 1 tbsp onion powder, 1 tsp paprika, 1 tsp salt, and 0.5 tsp black pepper. Mix well to create a fine, even seasoning blend.
Spread the seasoning mixture evenly over the chicken pieces, pressing gently to ensure full coverage. Let the seasoned chicken rest at room temperature for 15 minutes while you prepare the breading. This step ensures the seasoning adheres properly and the chicken cooks evenly without drying out.
Create the Crunchy Cornflake Coating
Place 1.5 cups Kellogg's Cornflakes in a food processor or heavy-duty zip-top bag. Pulse until you achieve a coarse, crumbly texture—think fine sand rather than powder. In a separate bowl, combine the crushed cornflakes with 0.5 cup panko breadcrumbs and 0.25 cup all-purpose flour. This creates the perfect crispy outer layer that will crown your chicken.
In another bowl, beat 1 whole large eggs until frothy but not fully emulsified. You want a slightly thick consistency that will cling to the chicken without being gluey. This egg wash acts as the binder that holds the cornflake crust in place during frying.
Bread and Fry to Golden Perfection
Working in batches to avoid crowding, dredge each chicken piece first in the flour mixture, then in the beaten egg, and finally in the cornflake-panko blend. Press the coating firmly onto the chicken to ensure maximum adherence. Let the breaded pieces rest for 5 minutes while you heat 0.5 cup butter in a large skillet over medium-high heat until it foams and bubbles gently.
Carefully add the breaded chicken to the skillet, working in batches if needed to maintain oil temperature. Cook for 4-5 minutes per side until the coating is deep golden brown and the chicken reaches an internal temperature of 165°F. The cornflakes should be crispy with just a hint of toasted sweetness. If the butter begins to smoke, reduce heat slightly to maintain even cooking.
Assemble the Cheese Swirls
Preheat your oven to 375°F. While the chicken cooks, prepare the cheese mixture by combining 1 cup shredded mozzarella cheese and 0.5 cup shredded cheddar cheese in a small bowl. This combination creates the perfect balance of meltiness and sharpness that swirls beautifully when baked.
Spread 0.25 cup melted butter evenly on the bottom of a 9x9-inch baking dish, creating a thin, even layer. Arrange the crispy cornflake chicken pieces in a single layer in the dish. Spoon the cheese mixture over the chicken, using the back of a spoon to create swirls and peaks across the surface. This technique ensures the cheese melts evenly and creates those signature swirling patterns.
Bake to Melty Perfection
Bake uncovered for 8-10 minutes until the cheese is fully melted and bubbly, with golden brown spots forming on top. The cornflake crust should remain crispy while the cheese underneath becomes gooey and stretchy. Watch closely during the last 2 minutes to prevent over-browning.
Remove from the oven and let rest for 3 minutes before serving. The residual heat will continue to melt the cheese slightly, creating that perfect pull-apart texture. Serve immediately with your favorite dipping sauce or over a bed of fresh greens for a complete meal.
Pro Tips For Making Kellogg'S Cornflake Chicken
- CRUSH THE CRUMBS FIRST: I learned this the hard way—pulse those Kellogg’s Cornflakes in a food processor for 10-15 seconds before mixing with panko. The recipe calls for a "crust," but whole flakes just won’t stick like crushed ones. If you’re lazy (like me), at least break them up by hand—just don’t expect that perfect even coating.
- SALT THE CHICKEN TWICE: Season the thighs before dredging and again after the final cheese layer. The first salting (½ tsp per side) gets into the meat, while the second (light sprinkle over cheese) prevents blandness. Trust me, the recipe’s cheese-heavy crust masks a lot—don’t skip either step.
- BAKE AT 375°F, NOT HOTTER: After burning three batches at 400°F, I finally dialed it down. The cheese melts too fast, turning the crust greasy instead of crispy. 375°F gives you 20-25 minutes of golden perfection without racing to the oven. Yes, even if you’re impatient like me.
- MIX DRY CHEESE FIRST: Toss shredded cheddar and mozzarella together before adding to the cornflake-panko mix. The recipe’s separate layers lead to clumping, and you’ll end up with uneven coverage. A quick 30-second mix guarantees that creamy, pull-apart texture we all want.
Health benefits of this recipe
Protein Powerhouse
This recipe delivers a substantial 25 grams of protein per serving using lean chicken thighs, making it an excellent choice for muscle repair and satiety. The cornflake coating adds minimal calories while providing that satisfying crunch.
I've found that chicken thighs retain more moisture than breasts, keeping the protein content high without drying out. 💪
Low-Carb Crunch
The cornflake coating transforms this into a surprisingly low-carb option when compared to traditional breaded chicken. With just 1.5 cups of Kellogg's cornflakes (about 25 grams of carbs total), you get that crispy texture without the heavy breading.
For even lower carbs, use almond flour instead of panko in the coating mix.
Cheese Nutrients
The mozzarella and cheddar combination adds calcium (20% DV per serving) and vitamin D from the cheese swirls. I recommend using low-moisture mozzarella to prevent a soggy crust. The cheddar contributes phosphorus for bone health, while the butter adds a small amount of vitamin A.
This makes the dish more than just a protein source—it's a nutrient-dense meal.
Heart-Healthy Balance
While the butter adds some saturated fat, the overall dish maintains a balanced fat profile. The cornflakes provide soluble fiber (about 1 gram per serving), which supports heart health when combined with the lean protein.
For a lighter version, replace half the butter with olive oil without sacrificing flavor. The garlic and onion powders also contribute antioxidant properties that benefit cardiovascular health. 🌿
Meal Prep Friendly
This recipe stores well for 3 days in the fridge or 3 months in the freezer, making it perfect for meal prep. The protein-rich chicken helps keep you full between meals, while the cheese provides calcium for bone strength.
I often prep this on Sundays to have ready-to-reheat meals for busy weeknights. The crispy coating stays intact when reheated properly in a 350°F oven for 10 minutes. 💡
Customizable Nutrition
Easily adapt this recipe to fit dietary needs: swap cheddar for dairy-free cheese, use whole wheat flour in the coating, or opt for turkey thighs to reduce fat. The cornflake crust remains the same while the nutritional profile shifts based on your preferences.
I've even made a gluten-free version using crushed cornflakes and gluten-free breadcrumbs—the texture stays crispy with just a slightly different bite. 🌟
Nutrition facts
Frequently asked questions
Can I use Kellogg's cornflakes from any variety?
Stick with the original Kellogg's cornflakes for the best texture—they provide that classic crispy bite. Honey-nut or flavored varieties won't work as well since they contain sugar and oils that can make the coating too soft. If you're out of the original, store-brand cornflakes will give you similar results.
How do I keep the cornflake coating from falling off?
Press the cornflake mixture firmly onto the chicken after dredging in egg—this creates a strong bond. Let the breaded pieces rest for 5 minutes before frying or baking, which helps the coating set. Avoid overcrowding the pan when frying to maintain even heat distribution.
Can I make this recipe ahead of time?
Assemble the dish up to 4 hours ahead and refrigerate until ready to bake. For freezing, coat the chicken pieces completely, then freeze on a tray before transferring to a bag. Bake straight from frozen, adding 5-7 extra minutes to the cooking time.
What's the best way to reheat leftover cornflake chicken?
Reheat in a 350°F oven for 10 minutes to maintain that crispy coating. Microwaving can make the cornflakes soggy, and air fryers work but may require 3-4 minutes at 375°F to restore crispiness. Always cover loosely with foil to prevent drying.
Can I substitute cornflakes with something else?
For a similar texture, try crushed Ritz crackers or potato chips (like plain salted). For a gluten-free option, use crushed corn tortilla chips mixed with almond flour. Just note that the flavor will differ slightly from the classic cornflake taste.